So I've Set Up My Server, What Now?
BrainFork's MCP (Model Context Protocol) server integration allows you to seamlessly connect your personal knowledge base to various AI clients. This guide will walk you through setting up BrainFork with Claude Desktop, ChatGPT, Cursor, and custom applications.
Phil Bennett
Head Brainforker
So you've created a BrainFork server. What do you do now? If not, you can register now for free and upload your knowledge before proceeding.
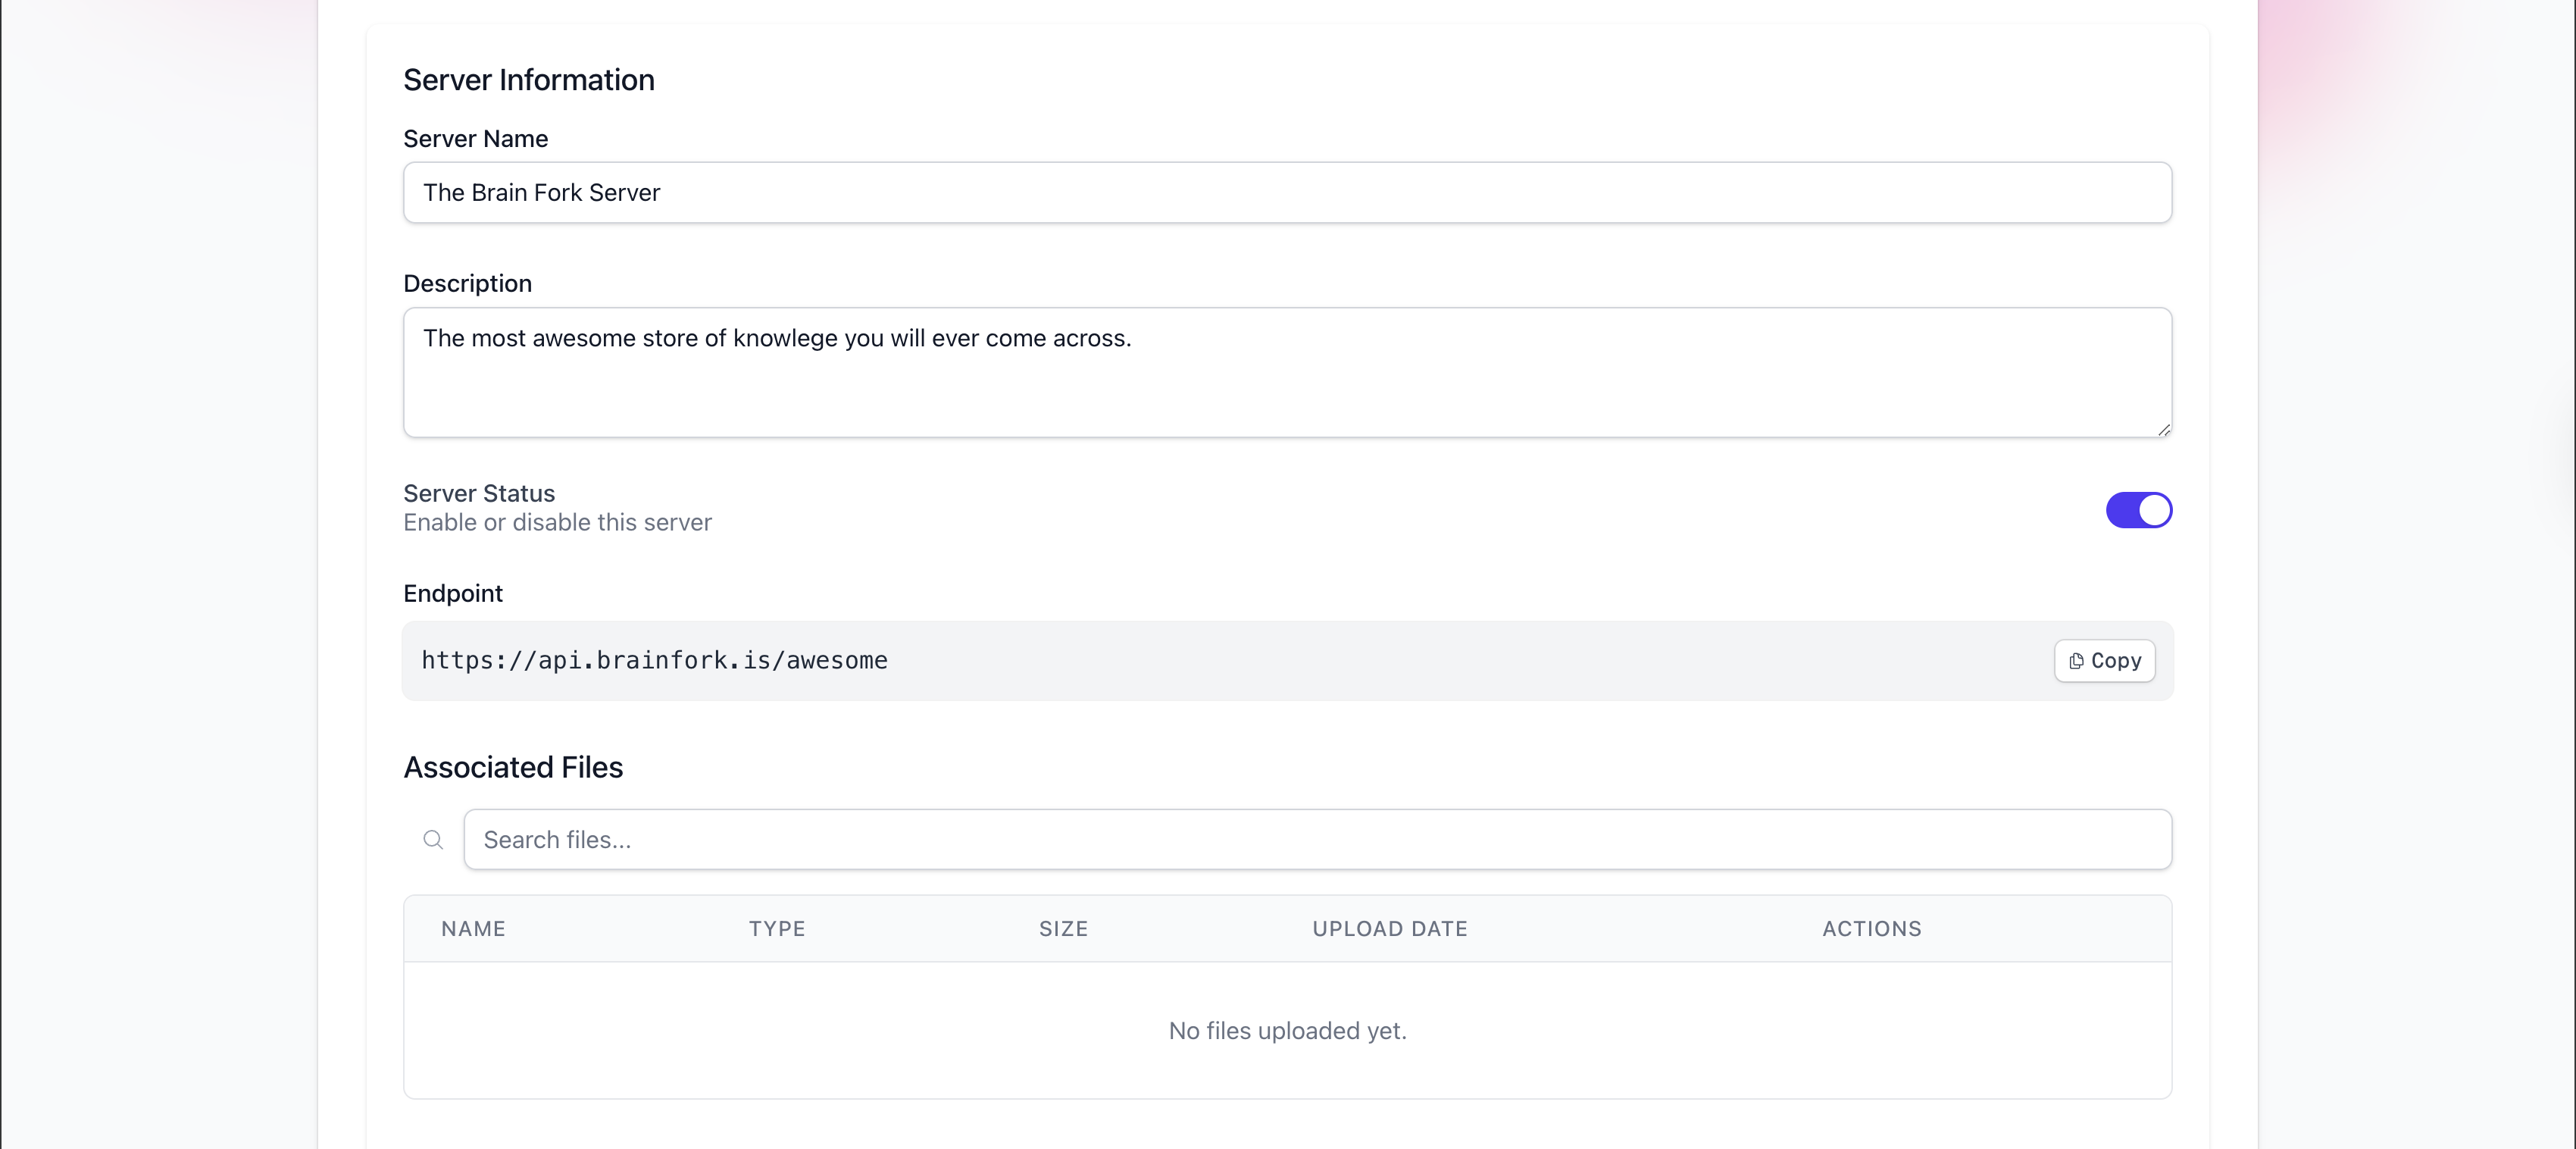
Once you have your server set up, you can connect it to any AI client that supports the Model Context Protocol (MCP). In most situations, you will only need your server URL, which you can find in your admin panel on the servers page.
Standard OAuth Flow
Most clients will allow you to connect to your BrainFork server with just this URL. When you add the endpoint to your client, it will trigger a login process that will allow you to give access to that client via your BrainFork login.
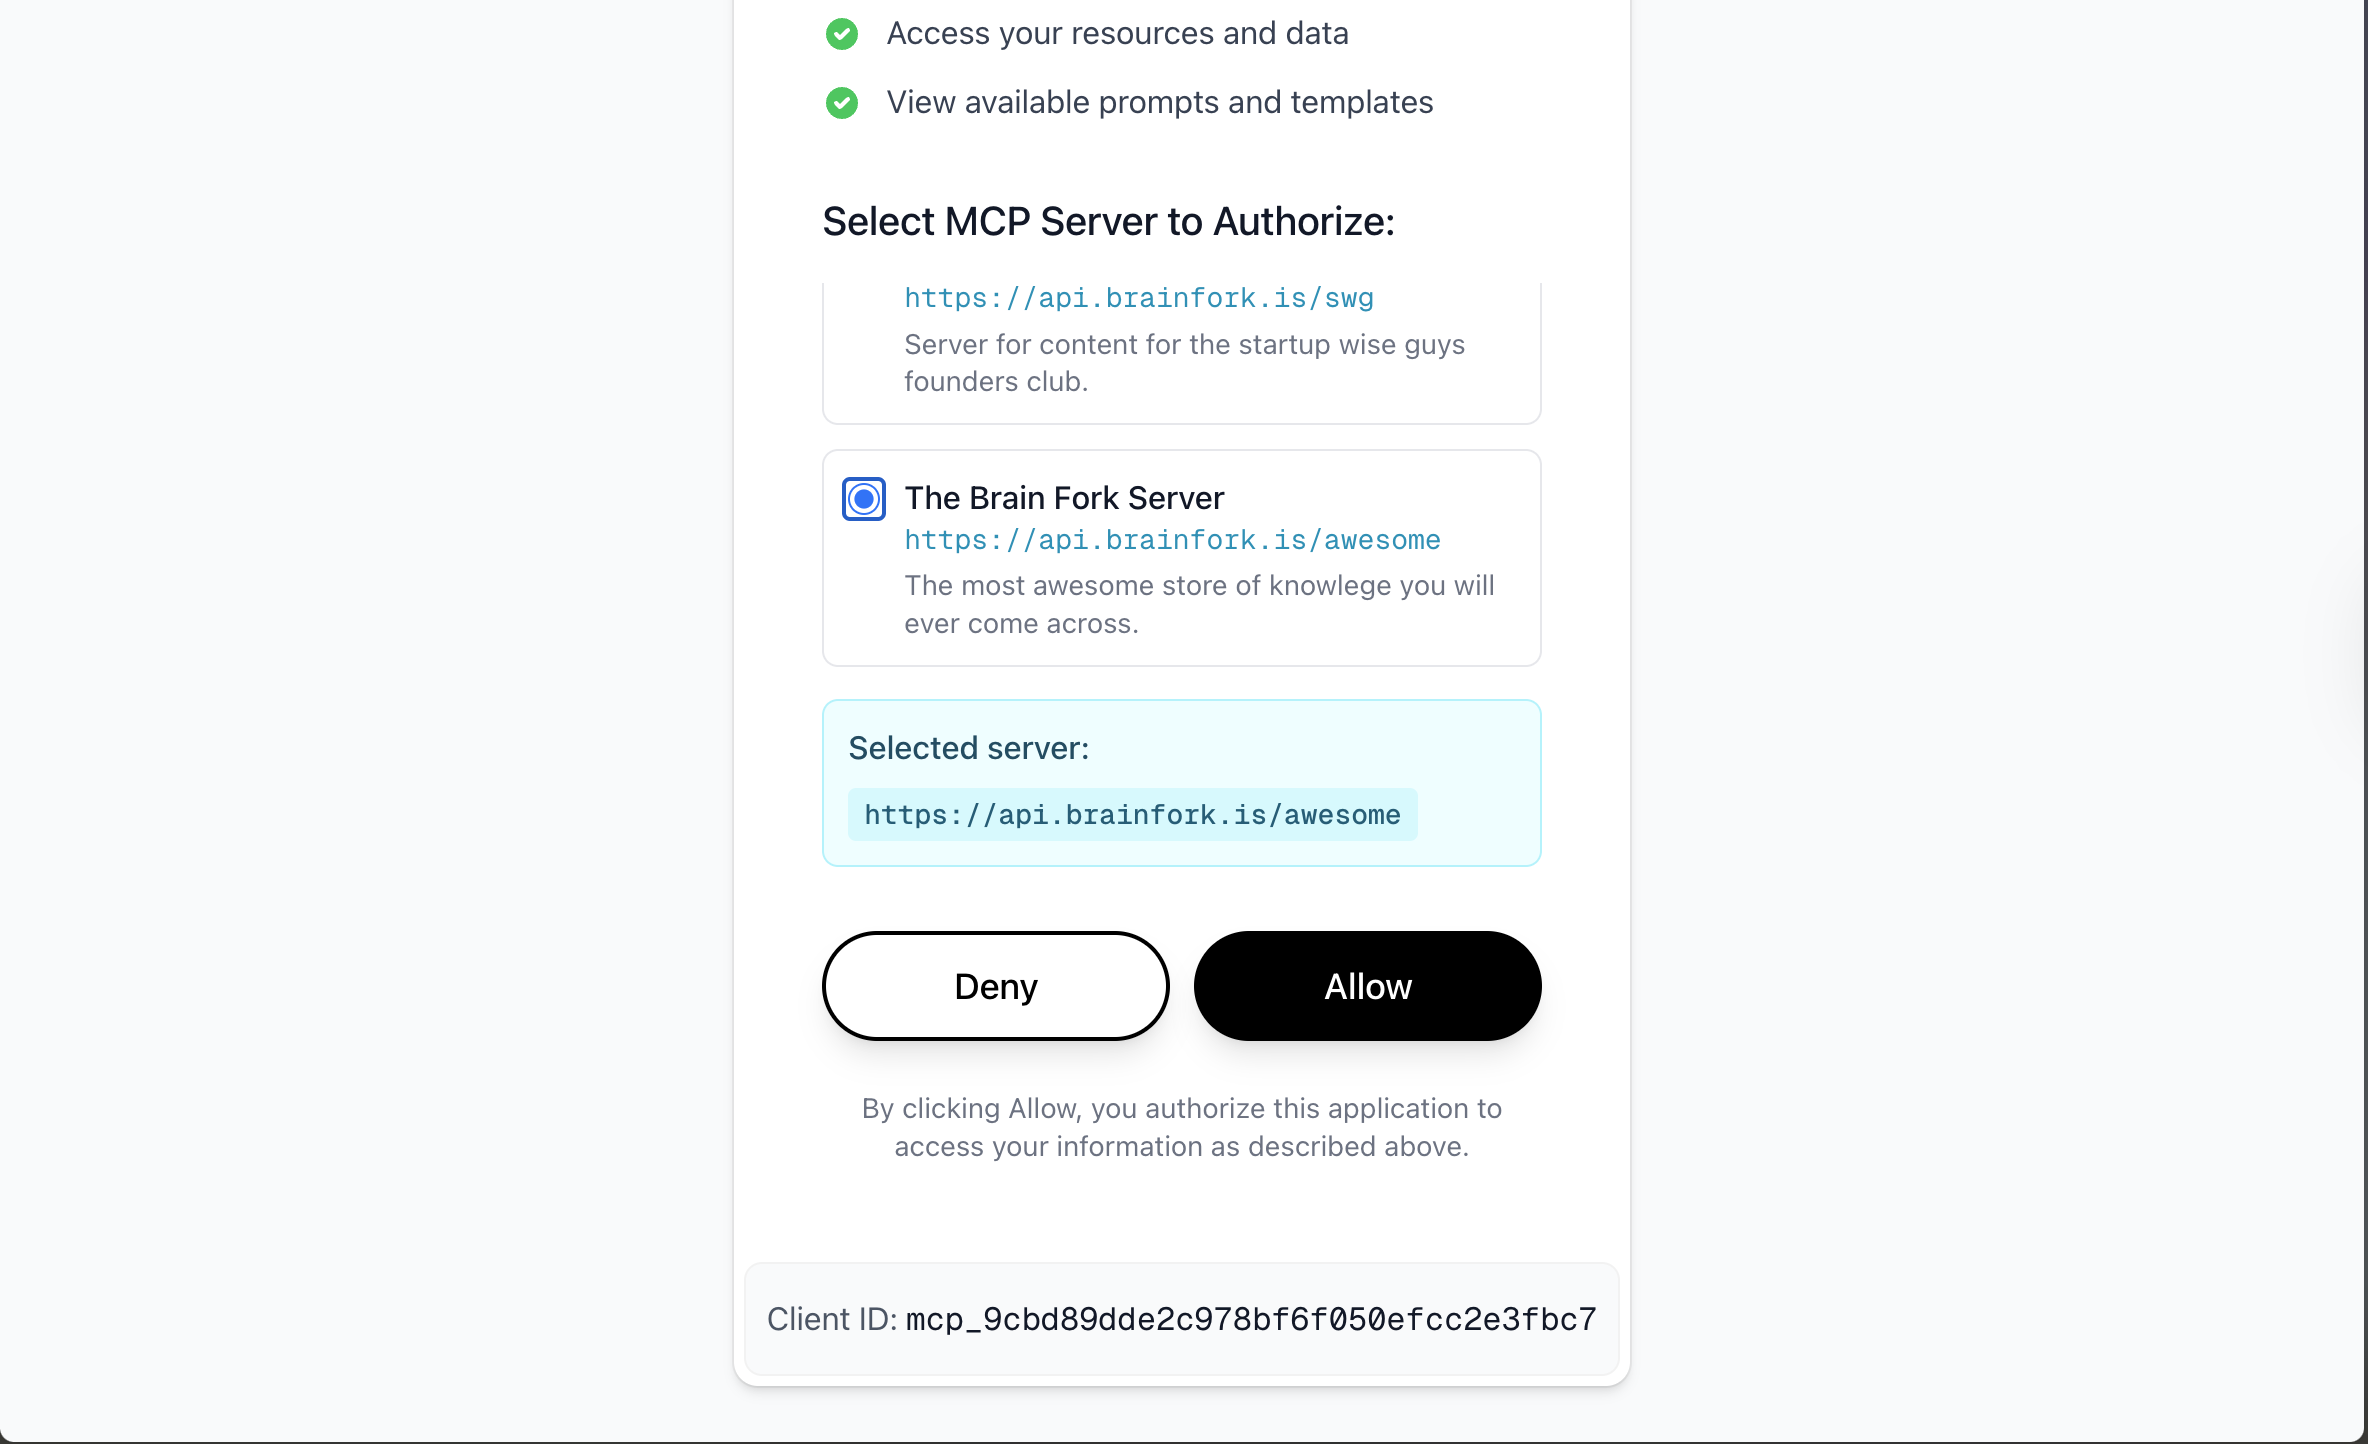
Once you've logged in, you will be shown a prompt to choose which server you want to allow access to. Make sure you choose the right server if you have more than one.
And that's it—the client should connect your server, and you should be ready to go.
To make things just a little easier, we've included some specific guides for some more popular tools to show how they work:
- Claude
- ChatGPT
- Cursor
We've also added a guide at the bottom of the document for those who want to generate their own OAuth tokens for services that don't support the standard OAuth flow, like custom agents, or tools that are a little behind in their support for the MCP specification. You'll find it at the bottom of the page.
Claude
- Go to the Claude "Connectors" page.
- Click on "Add Custom Connector".
- Provide the connector with a name and put your BrainFork URL in the "Remote MCP Server URL".
- Your server will show up in the unconnected section, and click on the "Connect" link.
- You will be taken to the standard OAuth flow as described above.
- Claude will give you a success notification. If you get an error, don't hesitate to get in touch with us at support@brainfork.isand we'll help.
You should now be able to see the option to turn your connector off or on in the options menu under the main prompt box.
Optional: We recommend adding something to your profile section under "What personal preferences should Claude consider in responses?" Add something similar to:
1I have attached an MCP Server called BrainFork that has a rag_query of all my notes and knowledge. You should use this whenever possible to understand me when making any recommendations and outputs.ChatGPT
Note: ChatGPT has only just started rolling out MCP support. It is currently (late July) only available for Team and above subscriptions. We expect them to roll this out to all users eventually.
- Go to the ChatGPT "Connectors" page. Note: if you have a company subscription, this might be here instead.
- Select the "My Connectors" tab.
- Click on "Create a Connector".
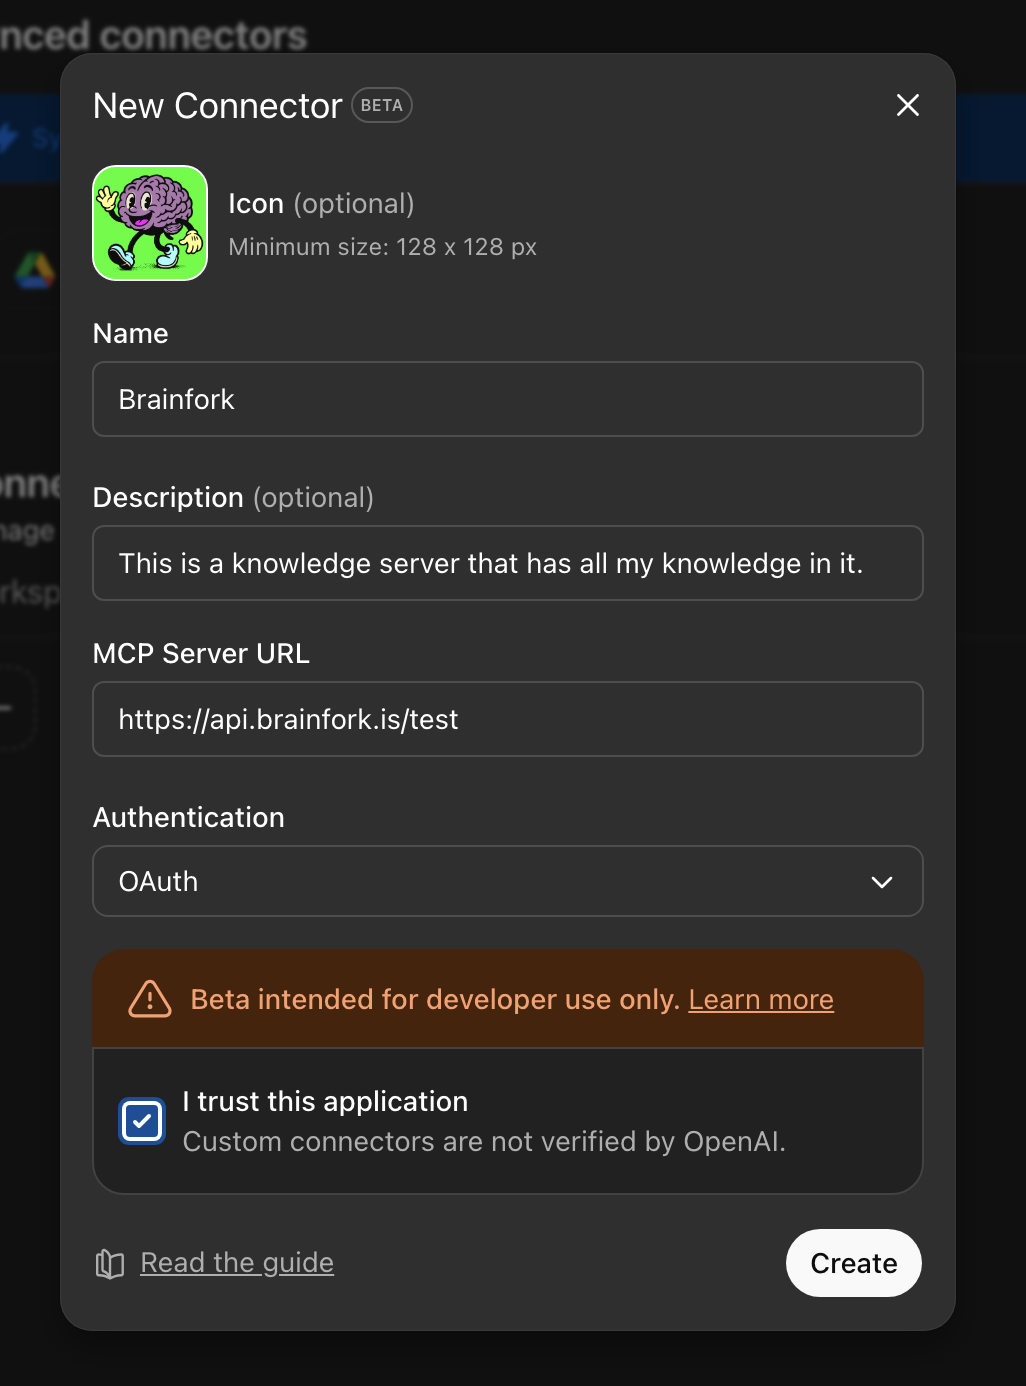
- Fill in the details like the screenshot attached and click "Create".
- You will be taken through the authentication process as mentioned above.
- You should now find your server as an Optional Source when you use the Deep Research tool in ChatGPT.
Cusor
Easy Option: BrainFork Easy Connections
- Go to the Server Management Page.
- Find the server you want to connect to Cursor and click on "Easy Connections".
- This will reveal a list of products you can easily connect to. Just click on the Cursor option.
- This will open Cursor and show you how to add your BrainFork server.
- When this has finished, you will see a "Needs Login" option next to your new server. Click on this and it will take you through the authentication process mentioned above.
- You should now see the tools available to Cursor in the config page.
Harder Option: Editing JSON Config
- Go to Cursor > Settings > Cursor Settings.
- Choose "Tools and Integrations" from the menu on the left.
- At the bottom, you will see "New MCP Server". Click this and you will be presented with a JSON file. Add your server as defined in the example JSON below, then follow the "Needs Login" steps above.
1{2 "mcpServers": {3 "Brainfork": {4 "url": "https://api.brainfork.is/test"5 }6 }7}Optional: We recommend adding a new Cursor rule to tell Cursor how to use BrainFork, something like:
1I have added an MCP server called Brainfork to the connect MCPs. It contains tools that allow you to search my knowledge and previous decisions. 2* Before making any changes you should check the rag_query tool to see if there is any relevant knowledge relating to the change. 3* Before making any changes you should check the get_decisions tool to see if we have made any previous decisions that educated how you should aproach the current challange. 4* When you have made a changes, please log the decisions you have made to the log_decisions tool.Custom Connections
If you want to connect to something that doesn't support the OAuth approval flow, then you will need to generate a token yourself.
Step 1: Find Your Server URL
- Log in to your BrainFork admin panel.
- Navigate to your Server Management page.
- Copy the provided server URL—you'll need this for all client configurations.
Step 2: Create a Bearer Token
- Go to your Server Management page in BrainFork.
- Click on "Manage" for the server you want to connect.
- Then scroll down and click "Create Token".
- Set a descriptive title for your token (e.g., "Claude Desktop", "Personal API Access").
- Choose an appropriate expiry date.
- Click "Create".
- Save the generated token securely—you won't be able to see it again.
You can now authenticate with your BrainFork server by setting the Bearer token in the header of your request
1Authorization: Bearer $YOUR_BEARER_TOKENExample Using cURL
Here's a basic example of querying your BrainFork knowledge base:
1# Query your knowledge base2curl -X POST "YOUR_BRAINFORK_SERVER_URL/mcp/call" \3 -H "Authorization: Bearer YOUR_BEARER_TOKEN" \4 -H "Content-Type: application/json" \5 -d '{6 "method": "rag_query",7 "params": {8 "query": "machine learning best practices",9 "limit": 510 }11 }'`Example Using the MCP SDK
For more robust integrations, use the official MCP SDK:
1$ npm install @modelcontextprotocol/sdk1import { Client } from '@modelcontextprotocol/sdk/client/index.js';2import { SSEClientTransport } from '@modelcontextprotocol/sdk/client/sse.js';3class BrainForkClient {4 constructor(serverUrl, bearerToken) {5 this.serverUrl = serverUrl;6 this.bearerToken = bearerToken;7 this.client = null;8 }9 async connect() {10 const transport = new SSEClientTransport(this.serverUrl, {11 headers: {12 'Authorization': `Bearer ${this.bearerToken}`13 }14 });15
16 this.client = new Client({17 name: "brainfork-client",18 version: "1.0.0"19 }, {20 capabilities: {}21 });22 await this.client.connect(transport);23 return this.client;24 }25 async queryKnowledge(query, limit = 10) {26 if (!this.client) {27 await this.connect();28 }29 try {30 const response = await this.client.request({31 method: "rag_query",32 params: {33 query: query,34 limit: limit35 }36 });37
38 return response.result;39 } catch (error) {40 console.error('Query failed:', error);41 throw error;42 }43 }44 async listResources() {45 if (!this.client) {46 await this.connect();47 }48 const resources = await this.client.request({49 method: "resources/list"50 });51
52 return resources.result;53 }54}55// Usage example56async function example() {57 const client = new BrainForkClient(58 'YOUR_BRAINFORK_SERVER_URL',59 'YOUR_BEARER_TOKEN'60 );61try {62 // Query your knowledge base63 const results = await client.queryKnowledge('python async programming');64 console.log('Search results:', results);65 // List available resources66 const resources = await client.listResources();67 console.log('Available resources:', resources);68
69 } catch (error) {70 console.error('Error:', error);71 }72}Example Using Python
For Python developers, here's a simple integration example:
1import requests2import json3class BrainForkClient:4    def __init__(self, server_url, bearer_token):5        self.server_url = server_url6        self.bearer_token = bearer_token7        self.headers = {8            'Authorization': f'Bearer {bearer_token}',9            'Content-Type': 'application/json'10        }11
12    def query_knowledge(self, query, limit=10):13        payload = {14            'method': 'rag_query',15            'params': {16                'query': query,17                'limit': limit18            }19        }20
21        response = requests.post(22            f'{self.server_url}/mcp/call',23            headers=self.headers,24            json=payload25        )26
27        if response.status_code == 200:28            return response.json()29        else:30            raise Exception(f'Request failed: {response.status_code}')31# Usage32client = BrainForkClient('YOUR_SERVER_URL', 'YOUR_TOKEN')33results = client.query_knowledge('project documentation')34print(json.dumps(results, indent=2))\`\`\`
You're Ready!
The world of personal knowledge management is now open to you, and we'd love to hear what you're doing with your BrainFork server. If you have something exciting to share, or you're still a bit stuck, please feel free to drop us an email at support@brainfork.is.
Ready to own your AI knowledge?
Start building your personal AI infrastructure today.
Get Started Free